")
")
- The Calculator Store Offers
- Scientific calculators
- Financial calculators
- Graphical Calculators
- HP Calculator Repair Service
- Classical HP Calculators
- The HP41 Corner
- The HP Prime Corner
- The HP15c Corner
- The HP12c Corner
- Calculator Accessories
- Selection guide
- Special offers
- Calculator blog
- Blog in Spanish
- Site Map
- Calculator Reviews
- Books
- Education
- why RPN?
- Cheap&cheerful calculators
-
The Calculator Store Club

- Audio

Calculator Types Calculator blog Posts on topic: HP calculator repair
Calculator blog
Musings and comments about our common interest
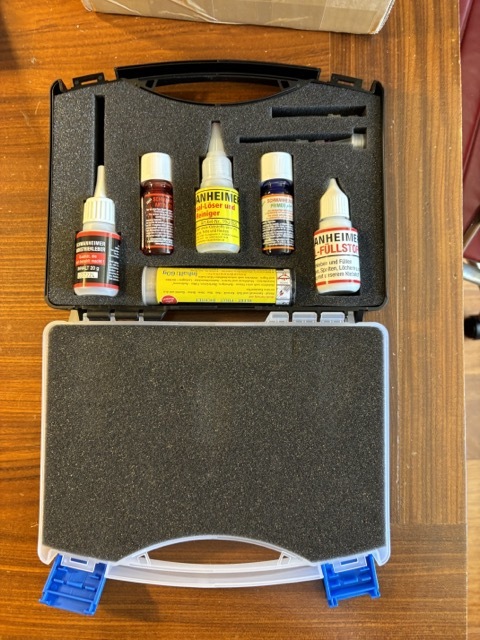
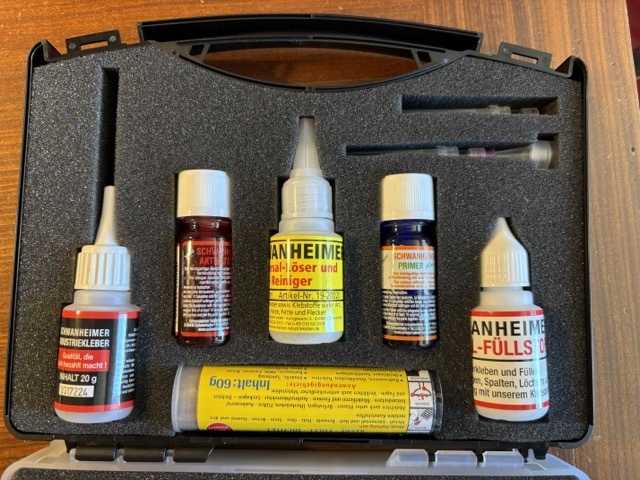
Continuation of "New glue..."
I have been using the Schwanheimer Industriekleber 100 glue already for some time. When properly using (making generous use of the primer on both sides) it is the best glue I have used for calculator repair. Better and thinner than E6000; no comparison with E6000+; and miles ahead than other cyanoacrylates. I think the primer makes all the difference.
You can read my initial feelings on this glue here: http://www.thecalculatorstore.com/Calculator-blog/A-new-glue-for-HP-repairs
So much so that when the glue is finished (the primer is not, yet), I have gone to their website and bought the whole pack: it comes in a portable plastic bag. I am looking forward to finish all the repairs that I have in front of me, and I will report later. It includes an accelerator, a filler, a mechanizable patty and a solvent too.
HP calculator repair
 From time to time we receive emails on whether we repair HP calculators. This makes me wonder on how well we communicate: this is what we do! So we have thought it out and decided that apparently it is not clear from our website. Then we have decided to open a new department on the website about repair.
We are specialists on HP41 and card reader repairs, but we also have a partner (Ignacio Sánchez) who is expert on the rest of calculator types: Woodstocks, Classics and Spices.
We think that newer calculators (Pioneers, Clamshells and the HP48 family are far more difficult to repair than the previous models, much more modular and where the problems are typically mechanical in nature. And for some models (HP50g, HP17bII, you are much better off if you just buy a replacement off an auction site.
We also sell parts for repair (now based on the HP41 family but also battery solutions for other ranges too) and we plan to offer calculator enhancements (HP41CL in the past, bu we will try the Panamatic and Teenix solutions that improve on the previous calculators with a number of interesting additional features.
Buying second hand
As we convert HP41 into HP41CL, we need to buy second hand units. This is getting increasingly difficult - prices are skyrocketing in the usual sites, with prices above 250€ for a CV calculator being normal, and not rare when the prices are above 500€. In some cases, ddefective units are sold for more than 150€. This in Europe - North American prices seem to be more normal, but then you have the import and shipping charges, which typically add more than 40% to the price. This makes our task more difficult.
Also our trusty calculators are getting older. The plastic they are built of is getting increasingly fragile and brittle, and they are breaking more and more. Some of these cracks are visible, some are hidden and more difficult to see. I have in my drawer more than 15 calculators that we have not been able to repair, or which it does not make sense to repair due to the cosmetic state of the calculator. These were sold as good sometime in the past. So the sage latin advice, "caveart emptor", stays relevant more than ever. Which is why we offer a 1 year guarantee for our vintage calculators (quite different from the "no returns accepted" seen in other places)
Repairing your calculator is increasingly the best option in many cases - the newer nylon-based 3D printed parts substitute advantageously to the brittle, fragile parts of old. I am now thinking about the battery bay for the HP41, where the originals are breaking by the corners, or the side cover of the HP41, with its fragile legs.
Development priorities
We are preparing the development plans for 2020. Your requests would be listened to, but be aware that someone insisted heavily on creating the Woodstock battery bay and we didn't get an order from her finally! So we would like to have some quorum for the demands.
My list so far:
- USB connected HP41c adaptor (not battery - putting any kind of electronics inside would require huge certification effort (or alternatively huge risks for our very small company). It will be a 3D printed part with a connector. The jury is out as to whether to include a capacitor to hold the charge for longer.
- A permanently glued battery-ports connector, to hold better together with the back case.
- Many other small items for HP calculators: screws, spacers, screen plastic covers, etc.
- Finish a HP41c repair manual (we're already half way through)
Please also submit your requests to jose@thecalculatorstore.com too!
The problem with ordering bulk in China
As you know, we're getting some parts produced in China. One of them is the feet for calculators we are selling. We have ordered samples from a producer, and when satisfied then we ordered a big lot.
When we have received it, after paying the producer and 100€ in import duties, we see that the producer has "improved" the product by rounding the edges. Nice, but completely wrong for our requirements, as can be seen in the enclosed picture. The whole shipment to the dustbin! We have ordered a new production batch but will take some time to arrive.
Continuation on new repair aid piece
I have now an old HP41c where the upper circuit is pressed down to the zebra connectors via nuts. Now, it is difficult to ensure an even pressure and I am having problems with some of the digits. But if we force the nuts, I may break the post - as it has happened in other cases. These are the situations our new piece (wait until we can put it on sale) is made for.
This piece is intended to be put on the lower posts (where it fits tight to aid in case of cracked posts) and gives the necessary mm. of thickness so that the back side of the original type can pass the pressure on the circuit so that it stands firm on the zebra connectors. This negates the use of nuts, which can be changed only a couple of times, lest they break the thread of the post (or the post directly, as it has happened to me a couple of times). I am testing different thicknesses to find which will be the final product.
Say goodbye to the nuts!
A new product for HP41c repair
We have now prepared a couple of new products designed to solve more HP41CL repair problems. We will discuss today the first one.
Our bent to do c to CL conversions has led us to specialize on full nut repair, instead of half nuts. But some of the tools and methods are also valuable for half nuts too!
The first of the new items we have created is the adaptor to replace screwed nuts in the original HP41C. You may have seen one of this: the processor circuit is secured to the main board with metal nuts around the lower screw posts. The problem with these: it is very easy to destroy the thread, since he read was formed by the action of the nut on the first attachment, nearly 40 years ago!
In the later units, the processor was secured in place by the pressure of the back side through two cylinders collated to the case. If you have one of the old cases, and you have broken the nut thread, you need to find a solution to push the circuit down against the zebra connectors. This is such solution.
We have created a nylon piece that fits tightly around the lower screw posts, with a small bezel to ease the port entrance, and occasionally making a broken post able again. This piece translates the pressure from the back side of the calculator down to the circuit. Don't need to find the right height, or to adjust the angle: it will work - every time.
The piece has sides! As the back side has an angle compared with the circuit surface, we needed to create this angle to the piece. Therefore it can only be put one way.
As the color here really doesn't matter, we have created the price in the cheapest, clearest color from 3D printing: white.
I hope that is piece helps some of you fixing your beloved calculator!
Clamshell and Pioneer Repairs - first comments
I am receiving many request to repair Clamshell (28c, 19bII, 18b) or Pioneer-type (42s, 17bII, 32s and many more calculators). Opposite to the previous models, these were built NOT to be repaired. The parts or the body are thermo-soldered, and opening them means typically breaking these bonds - which are quite difficult to repair in an aesthetically correct way.
There are some websites that talk about this. Most notably you can see repairs for a HP17bII here:
http://www.keesvandersanden.nl/calculators/hp32sii_repair.php
And here also (about a HP42)
http://www.hpmuseum.org/cgi-sys/cgiwrap/hpmuseum/articles.cgi?read=199
How to create your own HP41CL

I have finished the current batch of 41CL from Systemyde. Time to reorder. Please show your interest if you would like to buy one. If not, it’ll take longer to receive the board. I am only purchasing as many boards as interest shown from customers. I will order another one this time since the damned loss of my calculator during the latest business trip. Every time I think about it, it drives me mad.
It seems that many people are attracted to this calculator, but they do not dare to assemble theirs. On one side, they may have an old HP41c laying around, but for personal reasons, they want to keep it as is; on the other hand, to spend over 100€ in a bet in Ebay (where you can end up with a non functioning calculator, or one with deficient aesthetics) is a risky proposition. And they do not feel comfortable opening their calculator to do it.
While I am very satisfied by doing this work, I would not like European calculator amateurs to be put off to buy from us to get this wonderful calculator. I encourage them to try by themselves. If they fail, they always have professional repairers that can finish off their job properly.
Just a couple of hints to a successful HP41CL conversion.
- It is fundamental to start off a good calculator. It does not need to work - in most cases it will work; but you need to have good battery contacts. Rust in them will spread though the calculator and ruin your investment.
- There are alternatives to repair the battery/port connection circuit. You can buy from us a self-adhesive printed circuit that will substitute your original rusting unit.
- Be careful to clean all contacts with a good contact cleaner. I use Craig’s Deoxit D5L for a start, then rub the contacts to remove all grease and rust, and then Craig’s Deoxit Gold for further protection. (the latter enters the metal interfaces protecting them. It is widely used in the Hi-fi specialist area, when there are noise in the connections.) The contacts to clean are
- The contacts of the new board
- The contacts that will connect with the board
- The contacts between the battery module and the circuit itself (on both sides)
- The contacts in the ports
- The more tricky part comes on the assembly. You need to make sure that the board presses on the connection pad below it. This is the point where most full nut calculators fail. This makes indeed buying a non-functioning full nut such an easy bet, and the reason why non-working, good condition full nuts reach 60-70 € in Ebay - it is soo easy to repair them. Coming my way, there have been a number of repaired units, where you can see different methods used by different repairers. The most common is to put some springy matter around the holes, so that the box makes pressure on them and thereon to the pad below. Other methods with good results are putting oversized thin nuts on the calculator back, around the screw posts, so that when closed they make pressure on the board (be sure to cover all metal on them so that no electrical connection can happen) Be aware: you need to put pressure on the board, not on the screw posts. These do not help in making a good connection!
- Do not be put off if it does not work on the first time. Discard the thought of the CL board not functioning - it has never happened to me. When I had problems, it always came down to bad connection between module and pad below. Add more springy matter, check the screw posts and repair if needed (Loctite’s Superglue 3 is good if you allow it to cure properly. Good practice is to secure it with a very fine transformer copper cable around it), and reassemble it again. It will work!
- As a result of the CL project, I have several original C and CV working circuits, that I can install in your calculator if you ever fail. But I insist: no CL board has ever failed to me.
- Regarding the serial connector: So far, in my previous and lost CL, I had it installed but to be honest, I have never used it. It occupies a full physical port permanently and gets little use. For my next CL, I will not put it initially and will consider instead other interface options, given that I already have a HP-IL. (look forward to a HP-IL special. I am preparing a “vintage laboratory”, HP-IL based, for home, complementing the HP-IB laboratory that I already have in the cabin.)
- You can find in Ebay lots of additional parts. You can buy from us battery holders, rubber feet sets, etc. Beware that the rubber feet, while practical and cheap, can only be used once, compared with the original rubber feet that could be used several times.
Once you have assembled your own CL, you will enjoy a sense of achievement (even though it was so easy), and admiration on how can a 30 years old machine be so well designed. As well, you will feel grateful to Monte Dalrymple and his outstanding achievement.
But if you still do not dare to do it, even after the above, please contact us at jose@thecalculatorstore.com for quotes and pictures of the donor calculators. We’re more than happy to help!!! As well, we’re willing to buy your malfunctioning full nut HP41c or cv.
Now I am looking for a way to produce overlays for all the software we now have in a convenient way.
Last but not least: software. I do not know what you will fill your CL with; but I draw the Library #4 software suite from Angel Martín, including the PowerCL, Sandmath 44, advanced matrix #4, OS additions and others. Programmed mostly in Mcode, these change your calculator to a very different animal.
PS: Gardermoen airport has informed me that they have found the HP15c LE that I have lost the past week. Not all is lost! However, I had already opened another one, so I will give it to one of my children.