")
")
- The Calculator Store Offers
- Calculadoras cientificas
- Calculadoras financieras
- Calculadoras Gráficas
- Reparación de calculadoras HP
- Calculadoras HP Clásicas
- El Rincón de la HP41
- El Rincón de la HP Prime
- El Rincón de la HP15c
- El Rincón de la HP12c
- Calculator Accessories
- Guía de selección
- Productos en Promoción
- Calculator blog
- Blog en Español
- Mapa del sitio
- Comparativas
- Libros
- Education
- ¿Por qué RPN?
- Calculadoras baratas
-
The Calculator Store Club

- Audio

Calculadoras Calculator blog HP 41C repair kit
HP 41C repair kit
It is curious how things change over time. In the past we have sold very few HP 41c battery bay repair kits. However, we have seen recently a mounting interest on these. So much so, that we ordered another small batch. Well, it is gone already, and therefore we are ordering another 15 units.
While clearly not a best seller, the HP41c repair kit shows that the HP41c is far from dead. There have been three lots of the mighty HP41CL, designed by Monte Dalrymple, each with more modules built in, and all three lots have been exhausted. Now, another lot, the 4th, has been produced and some units are coming our way. But many of the HP41c that we have seen recently, while magnificent from the keyboard and scree point of view, have that little rust in the battery bay that renders them uncollectible, and unmodifiable for HP41CL use.
Our principle so far has been to convert only original units into HP 41cl; however, when i run out of pristine units, I used the Diego-designed flex circuit for my own HP 41CL. This unit is based on a otherwise perfect HP41C with tall keys. It has the best keyboard I have ever experienced in a calculator, and I spent a lot of time tweaking the bolt posts to make sure the tension was enough to produce a good electrical contact between the board and the processor, while at the same time the fantastic keyboard feel was not compromised on the two lower rows due to said pressure. It would have been a pity to have to throw it away for lack of a solution to its badly rusted battery bay.
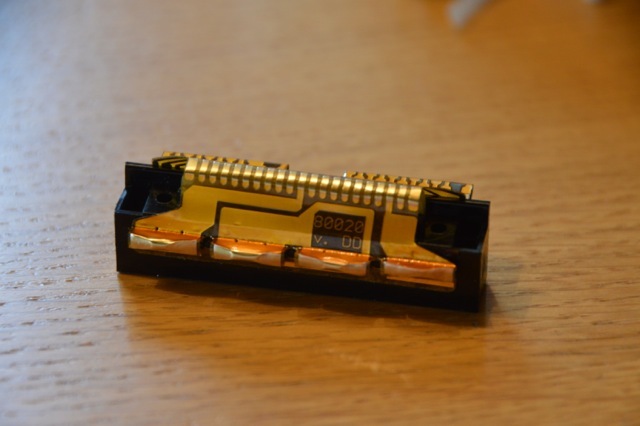
I think that all of you know already this little repair kit. It consists of a flexible circuit board, that has a strong adhesive on the back side. When properly folded and applied to the plastic that forms the battery bay of the old HP41c, it completely and neatly substitutes the circuit that came with it. This circuit had the tendancy to rust, typically due to acid leakage from batteries left for a long time within the calculator in humid areas. This has caused many a calculator to be discarded as dead (the other main cause being the lower screw posts being broken in full-nut models, resulting in an apparently non-working calculator. A firm pressure on the lower part of the keyboard often results on the display coming back to life. Many a calculator has revived in my hand this way, followed by a visit to heart surgery with 95% chances of total recovery)
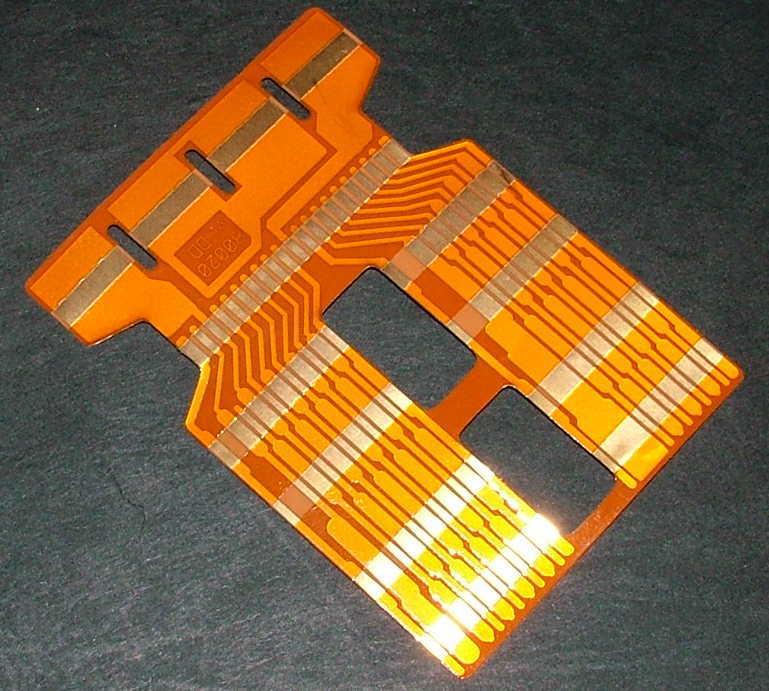
It would be false to tell you that installing this circuit sheet is easy. You need to be patient and follow the instructions to the letter. It is key to pre-fold it with bends as sharp as feasible - with care for not breaking any path.
The second important point is to make sure clean well the original plastic base from all prevuous debris - in particular of the rest of the original rivets that kept the original circuit collated.
The third key point is to start collating the circuit from the middle part between the module contacts. This is the most fdifficult part to do well, so why not to start there.
But don't worry: if I have been able to do it, surely you can. I don't know any person less gifted for the task, and I succeeded - first time. But you need to be patient.
I had several units in my hand before commencing. If I were you, I would buy two units instead of one. It would be a poity if you manage to break one, and then you need to wait for a week for the second attempt!